Auspex Water Installation
The Auspex Crimp System made for both cold and hot water applications, has revolutionised pipe fitting with its cut, fit, crimp, done process.
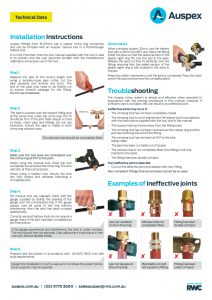
Installation Instructions
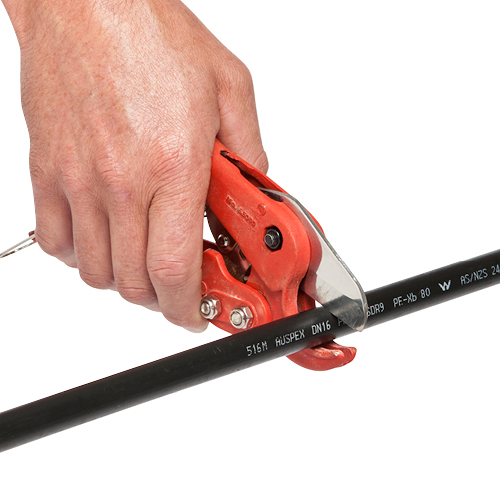
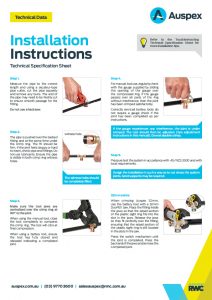
Step 1
Measure the pipe to the correct length and using a secateur-type pipe cutter, cut the pipe squarely and remove any burrs. The end of the pipe may need to be freshly cut to ensure smooth passage for the fitting.
Do not use a hacksaw.
Step 2
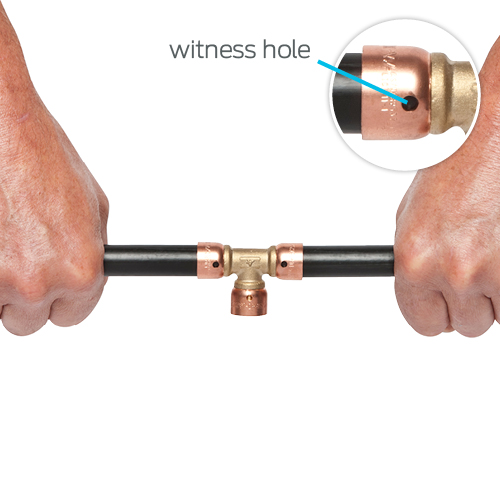
The pipe is pushed over the barbed fitting and at the same time under the crimp ring. The fit should be firm. If the joint feels sloppy or hard to insert, check pipe and fittings. Do not use lubricants. Ensure the pipe is visible in both crimp ring witness holes.
The witness holes should be completely filled.
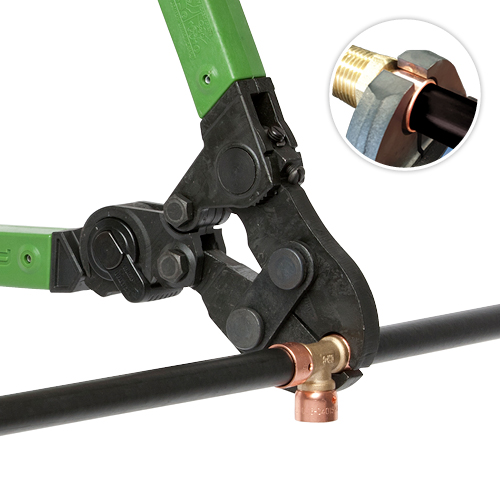
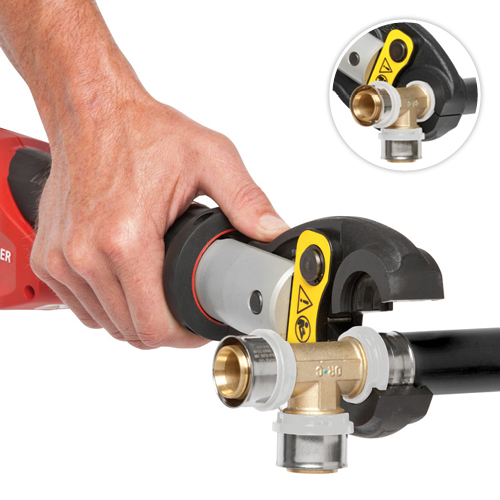
Step 3
Make sure the tool jaws are centralised over the crimp ring at 90° to the joint.
When using the manual tool, close the tool completely to compress the crimp ring. The tool will click at final compression.
When using a battery tool, ensure the tool has fully closed and released indicating a completed joint.
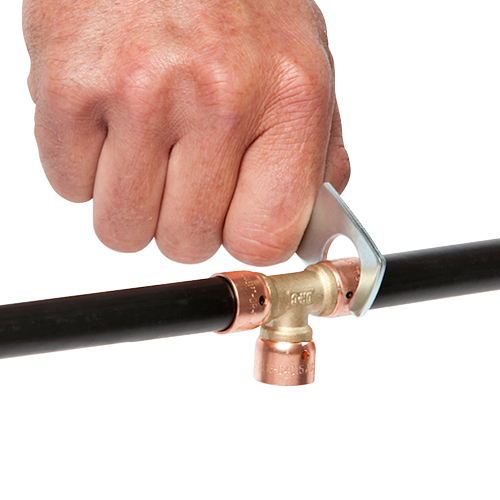
Step 4
For manual tool use, regularly check with the gauge supplied by sliding the opening of the gauge over the compressed ring. If the gauge passes over all parts of the ring without interference, then the joint has been crimped satisfactorily.
Correctly serviced battery tools do not require a gauge check if the joint has been completed as per instructions.
If the gauge experiences any interference, the joint is under crimped. The tool should then be adjusted. (See adjustment instructions in this manual). Do not double crimp.

Step 5
Pressure test the system in accordance with AS/NZS 3500 and with local requirements.
Design the installation in such a way as to not stress the system joints, bend supports may be required.
32mm Joints
When crimping Auspex 32mm, use the battery tool with a 32mm DuoPEX Jaw. Place the fitting inside the jaws so that the raised section of the plastic sight ring fits into the slot in the jaws. Release the jaws so they fit perfectly over the fitting, ensuring that the raised section of the plastic sight ring is still located in the slots in the jaw.
Press the switch mechanism until the joint is completed. Press the back end of the jaws and remove the completed joint.
General Installation Tips
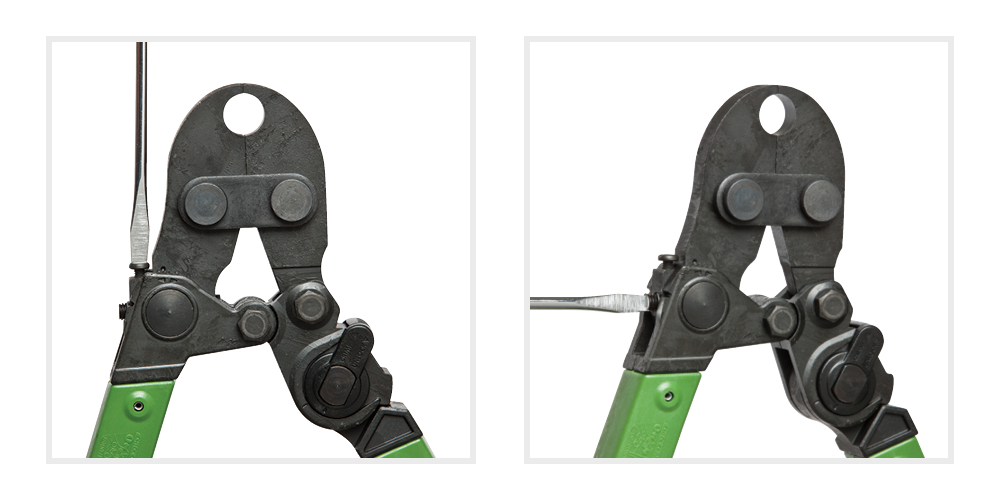
The Gauge
The gauge is one of the quality controls of the system. It verifies firstly that the ring has been crimped and secondly, that it has been compressed enough.
Gauging of the compressed ring should be done regularly throughout each job.
When using the gauge, slide the opening over the compressed ring. If the gauge passes over all parts of the ring without interference then the joint has been done satisfactorily. Do not place the gauge over the pipe and then move it back along the pipe and over the ring. This may not give a true reading.
If the gauge experiences any interference the joint is under crimped. The tool should then be adjusted. DO NOT DOUBLE CRIMP.
If the gauge is lost, it should be replaced immediately.
LDPE Holding Ring
The plastic ring on the 16-25mm fittings are only there to hold the crimp ring to the fitting. It plays no part in the integrity of the joint. It may behave differently after crimping, however as a general rule, the back of this ring should be flush against the body of the fitting and the crimp ring should be attached to it. This starting position will also help to ensure full penetration of the fitting inside the pipe.
For Mark II fittings where the crimp ring is held in place without the plastic ring, the tool jaws must be aligned to the end of the crimp ring where the pipe enters the fitting.
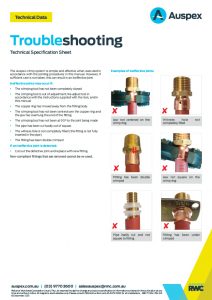
The Pipe
The pipe that comes out of the crimped ring at an angle may indicate that the pipe is not covering all of the barbs on one side. This situation may occur if a tight bend is made close to a joint or if the pipe has moved in some way prior to crimping.
Where possible, crimp the fitting before making the tight bend and install a clip close to the joint between the bend and the joint. Use a bend stabiliser to avoid stress on the joint.
Coloured Plastic Rings
The Auspex crimp system has a range of adaptors, which are identified by a different coloured plastic ring. Do not join Auspex pipe by using a fitting with a coloured ring. To identify the uses for these adaptors, consult your supplier or Auspex directly.
Pinched Ring
When crimping fittings which are flush to frames etc, check to ensure that the crimp ring has not pinched on the back side. Rings which are pinched in this manner should be replaced.
Clips
The clips should be installed so that the pipe can move freely through the clip. Plastic clips are recommended.
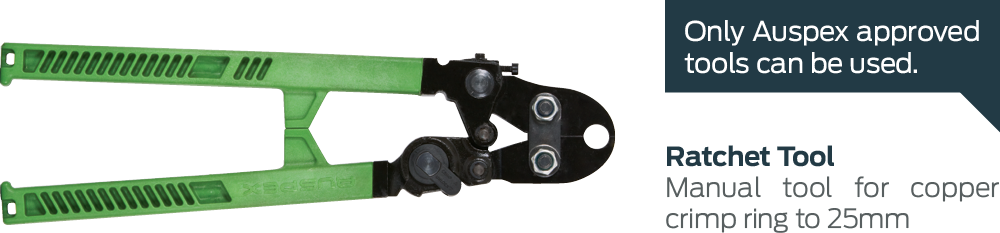
Tooling
Only Auspex approved tooling can be used with the Auspex system. Manual hand crimpers are available for 16mm, 20mm, and 25mm. Auspex and Rothenberger battery tools with approved jaw sets are also available, 16-32mm.
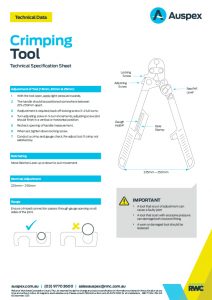
Tool Adjustment
-
With the tool open, apply light pressure inwards.
-
The handle should be positioned somewhere between 225-250mm apart.
-
If adjustment is required, back off locking screw 3-4 full turns.
-
Turn adjusting screw in ¼ turn increments, adjusting screw slot should finish in a vertical or horizontal position.
-
Recheck opening of handle measurement.
-
When set, tighten down locking screw.
-
Conduct a crimp and gauge check. Re-adjust tool if crimp not satisfactory.
Ratcheting
Move Ratchet Lever up or down to suit movement.
Nominal Adjustment
225-250mm.
Gauge
Ensure crimped connection passes through gauge opening on all sides of the joint.
IMPORTANT
- A tool that is out of adjustment can cause a faulty joint
- A tool that is set with excessive pressure can damage both tool and fitting
- A worn or damaged tool should be replaced
If the gauge fails, repeat adjustment until trial crimped joint is correct. More detailed instructions are included with the tool.
Joining To Other Materials
Threaded fittings are available to make the transition between PE-X pipe and other materials. Specialised and tested adaptor fittings are also available. Please see our product list or contact us for more information.
When Joining To Copper
- Flared copper compression to Auspex crimp adaptors are available.
- Brazing adaptors are available, designed so that one end can:
- Fit over 15mm, 20mm, 25mm and 32mm copper pipe
- Fit into expanded 15mm, 20mm or 25mm copper pipe
- Fit into standard copper or brass brazed fittings
- When brazing these adaptors they MUST be cold before inserting into the PEX pipe
- Push fit copper adaptors are available:
- Square cut the copper pipe
- Remove any burrs or loose material
- Ensure the outside of the pipe is free of scratches, marks etc.
- Push the copper fully into the fitting using a twisting motion
- Make sure the copper is not oval or out of round
- Do not use on annealed copper or coated copper e.g. chrome coating
- B-Press (crimp) copper to Auspex:
- See catalogue for available conversion fittings
- Follow the B-Press installation instruction for the copper crimp end
- Follow the Auspex installation instruction for crimping the PEX end of the fitting